A Battery Discharge Problem With a Happy Ending!
By Dave Hill
www.londonroadgarage.com
Recently I was faced with a customer who had completely given up on the idea of her car ever being fixed. The lady owner of a 2001 Audi A6 1.8 Turbo, explained to me how she has always had problems with the battery discharging. In all of the time she has owned the car, she has had to resort to jump starting it most mornings and has also been buying a new battery about twice yearly. She went on to say that an Audi dealer and a local auto electrician have looked into the problem, without success. In fact the dealer had told her that there wasn’t a problem at all, which is worrying. Anyway, this is the kind of challenge I like and I suggested to her that I ought to be able to fix it for her.
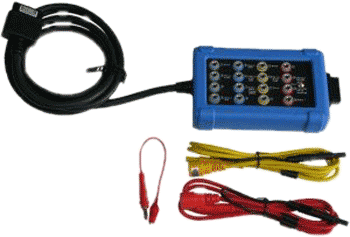
The car was presented to me, with a new “Silver Calcium” type battery sitting on the back seat, as the one fitted, although not very old, had already suffered from prolonged periods of total discharge. Using the low amps clamp that comes with the Pico Automotive Diagnostic Kit, I set about finding the cause.
Firstly I find it important to make sure that I am testing the vehicle in its natural state. By that I mean that it is of no use checking for an unwanted or “parasitic” drain, by simply disconnecting the battery terminal and connecting an ammeter. Electrical systems need to go through routines and sequences in order to shut down. Even after market alarms and locking systems will react to a momentary loss of supply that disconnecting the battery will cause. With this in mind, I carefully place a jumper cable between the negative battery post and the main terminal, taking care not to break the circuit and making sure that no small cables are left hanging. I need to use a jumper cable because the vehicles main cable is too thick to fit inside the jaws of the Pico low amps clamp. It is important that the jaws close fully to allow accurate current measurement. Now I am able to confidently see any current flowing from the battery.
My next step is to put the car through the normal routine that it would typically go through at the end of a journey. So I cycle the ignition on and then off, then open the driver’s door. Then, rather than closing the door, instead I manually flick the latch closed, which is enough to convince the vehicle systems that the door is shut (although this is not always the case). With the door now open I have easy access to the fuse box. Using the remote fob to lock and double lock the car I can step back to watch the scope trace.
As I study the waveform, initially I can see the current draw as the indictors flash twice, then I see a lot of disturbance caused by the interior lighting, as they do a “slow fade”. The detail that Picoscope captures, allows me to see the fact that the interior lights are controlled in a duty cycle manner and as the signal settles down we can see the steady current flow that the various control modules are consuming as they go through a routine prior to going to sleep.
In the animated image below we can see just how useful the oscilloscope is when dealing with modern vehicle electronics.

Ok, after allowing the vehicle to stand for a good hour I establish that the current flow doesn’t drop below 340 mA. Different makes and models display a variety of shutdown characteristics and plenty of time must be given to allow full sleep. I now set about pulling the fuses one at a time, until I identify which circuit is responsible for this stubborn discharge. This is not always easy to do, as some fuse boxes are located in hard to access places and often the alarm can be set off as you move around the car. This Audi was not too bad though and soon I am on to the culprit. As soon as fuse 15 is pulled, the drain could be seen to disappear and after several repeats of the same test I am happy that I am heading in the right direction.
My next step is to study some vehicle data and establish exactly what consumables are powered via fuse 15. I am now faced with just three possibilities, as fuse 15 supplies the instrument cluster, seat and mirror position memory module and the air-condition module. The instrument cluster is relatively easy to remove and disconnect and fortunately I strike lucky first time. Whilst watching the scope trace as I disconnect the instrument cluster I can see the current drop instantly. BINGO!
Keeping the customer “in the loop” is important for obvious reasons and as I had reached the limit of her agreed initial spend, I invite her to call in and see my findings. Even the untrained can gain an incite into the complexities and with some explanation, she was able to understand what had been found. I offered her the option of a replacement instrument cluster or the somewhat cheaper alternative, of a relay fitment, which would serve to kill the circuit at switch off. I explained that there maybe some minor implications, like the time and date would reset at start-up, but this was a small issue for her and she opted for the relay to be fitted.
Once I had fitted the relay, I needed to confirm the fix and after performing the same test as before, I was disappointed to see that a 360 mA current draw still remained. Back to square one! Well not exactly, after a few moments pulling fuses, I quickly established that the fuse that supplies the engine ECU was responsible for this new drain. Time for a cup of tea and some thought!
As often happens in our job, the cup of tea can work a kind of magic and as I return to the Audi I am pleased to see that the current trace has dropped to almost zero. I measure the time taken from doors locking, to full sleep and it is exactly fifteen minutes. A quick look at my amps clamp to make sure it still has a green light and my confidence starts to return once more. I still need to repeat the test and after seeing the same result several times, I can finally claim the fix.
The following image shows an uninterrupted 33 minute, 20 second capture of current flow. At half way, the point of complete sleep is clear to see.
So why was I seeing a different pattern to that which I had seen before, when the instrument cluster was still live? I had pulled the same engine ECU fuse in my earlier test and no drop in current flow was noted. I am not sure to be honest, but I wonder if maybe there is a dialogue between the engine ECU and the instrument cluster at switch off and now that the engine ECU isn’t having a successful handshake with the instrument cluster, it might be waiting a little longer to shut down. It might be the case that this vehicle normally takes fifteen minutes to go to sleep and that the cluster fault was disturbing the sequence. These are just my thoughts. but who really knows hey!
Once again Picoscope has helped me fix a fault that has eluded two other garages. Further proof (if more were needed) that the investment made in buying the scope and taking some training, has been a major step forward for our business.
Before I had the Pico, my preferred tool for this kind of test, was a good old fashioned Avo-meter. The analogue style meters display the current nicely. Looking back though, I think I would waste so much time on modern vehicles, as I can’t go and get on with something productive, like I can with the Pico. Being able set the scope running and leaving it for long periods whilst the Pico gathers data is a real bonus.
Do you still think that your hand held multi meter is up to the task?

|