USBee DX Bus Decoders
The USBee DX Logic Analyzer and Oscilloscope has a powerful embedded bus decoder feature that allows you to quickly analyze the contents of embedded communications captured by the pod. You simply setup a single waveform line as a Bus, capture a trace, and then click and drag to decode the bus traffic.
Bus Setup

To setup a single line on the waveform display as a bus, click on the white box to the left of the signal name. The Channel Settings dialog box will appear as below.
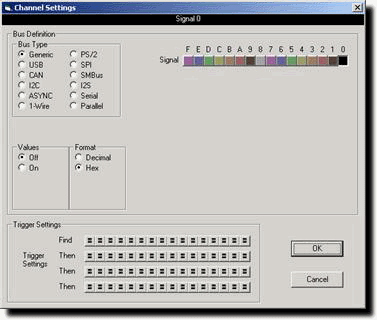
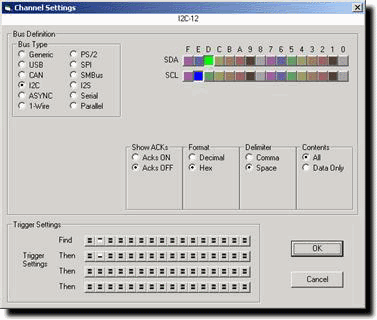
Select which bus you would like displayed on this line using the Bus Type radio buttons, select the required channels for the given bus type, and click OK. Below is an example of a setup for an I2C bus.
Once set, you see the bus identifier to the left of the signal name on the main screen.
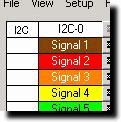
Each bus is renamed with the bus type followed by a number. This allows you to have many of the same types of busses, yet uniquely identify them in decoder listings.
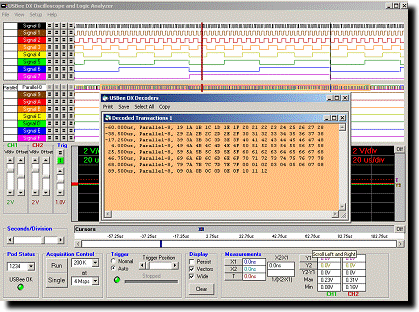
Decoding Bus Traffic – Click and Drag
Once a bus is defined you can capture data as usual. You can then scroll and zoom to find the area of interest on that bus.
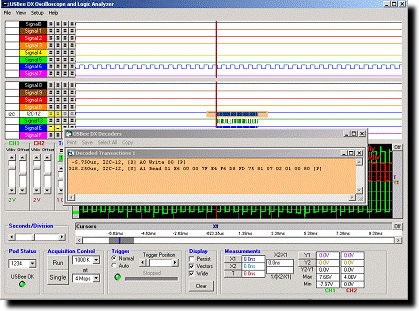
To decode a portion of the bus traffic, simply Right-Click and Drag across the waveform you want to decode. When you let go of the mouse button, the selected section of traffic will be decoded into the decoder window as shown below.

You can then scroll and zoom to see a different portion of the capture and decode a different section of bus traffic in the same way. You can decode up to 4 different sections and each section will display in its own window with matching color highlights.

When you click on the text portion of the decode window, the main waveform screen will move to make sure that the decoded section for that window is displayed.
Once the decoded text window contains the data you want to see, you have the option to use the menus to print that data, save it to a text file, or select it and copy it to the clipboard for importing to other programs such as Excel.
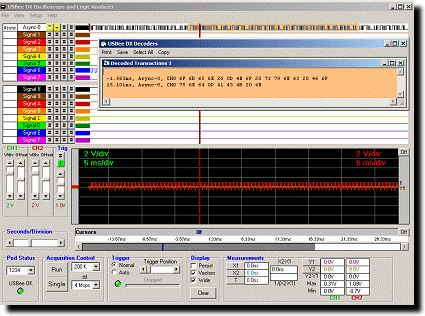
Decoding Bus Traffic – Multiple Busses
You can also decode multiple busses at the same time and get the traffic displayed in chronological order from the different busses.
First place the X1 and X2 cursors around the section of time you want decoded. Then choose the menu item View | Decode Busses Between Cursors. The decoder will then decode all busses defined, extract the data for each bus and interlace all data so that each transaction is listed chronologically.

Generic Bus Setup
Although not decoded in the decoder windows, you can combine multiple DX signals into a single line on the waveform display using the Generic Bus setting.
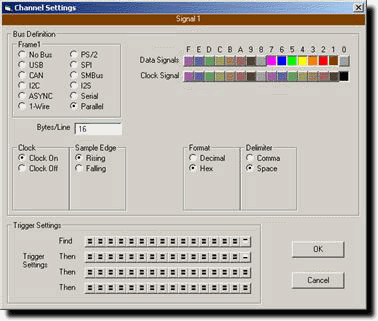
Activate the below Channel Settings Dialog by clicking the white box on the left of the signal names on the main application screen.
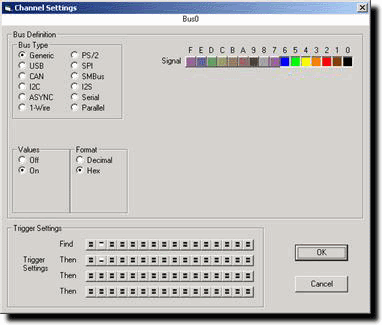
The resulting waveform shows the signals 0 through 6 on a single line of the display and shows the value on the waveform for those signals.

CAN Bus Setup
The CAN Bus Decoder takes the captured data from a CAN bus (11 or 29-bit identifier supported), formats it and allows you to save the data to disk or export it to another application using Cut and Paste.
Hardware Setup
To use the Decoder you need to connect the USBee DX Test Pod to your hardware using the test leads. You can either connect the test leads directly to pin headers on your board, or use the test clips for attaching to your components.
The CAN Bus Decoder connects to the digital side of your CAN bus transceiver and only needs to listen to the receiving side of the transceiver (such as the RxD pin on the Microchip MCP2551 CAN bus transceiver chip). Use signal 0 as the RxD data line and connect the GND line to the digital ground of your system. Connect these signals to the CAN bus transceiver IC using the test clips provided.
Software Setup
Activate the below Channel Settings Dialog by clicking the white box on the left of the signal names on the main application screen.
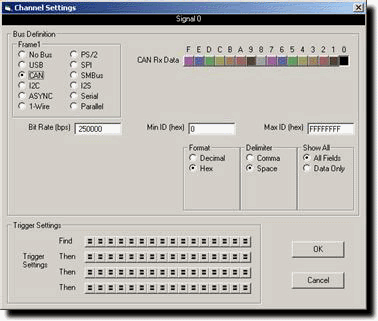
On the above dialog box, select the CAN data signal, what speed the bus is operating at, what filter value for the ID you want (if any), and what output format you want the traffic.
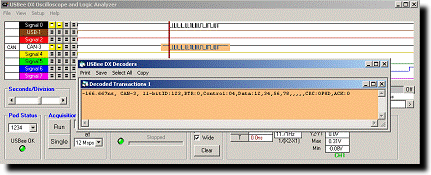
Then when you click and drag (with the right mouse button) on the waveform screen on that waveform, the bus traffic will be decoded as in the following screen.
USB Bus Setup
The USB Bus Decoder decodes Low and Full Speed USB. It does NOT decode High Speed USB. To decode Full Speed USB, the sample rate must be 24Msps, meaning you must sample with just 8 digital channels only. To decode Low Speed USB, you can sample as low as 3Msps.
Hardware Setup
To use the Decoder you need to connect the USBee DX Test Pod to your hardware using the test leads. You can either connect the test leads directly to pin headers on your board, or use the test clips for attaching to your components.
Connect two of the DX digital signals to the D and D- of your embedded USB bus, preferably at the IC of the USB device or the connector that the USB cable plugs into.
Software Setup
Activate the below Channel Settings Dialog by clicking the white box on the left of the signal names on the main application screen.
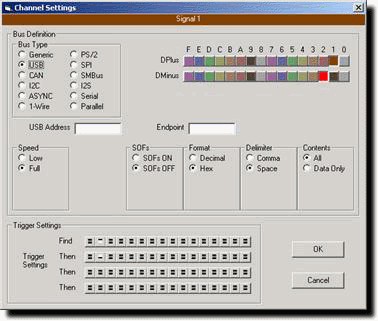
On the above dialog box, select the DPlus and DMinus signals, what speed the bus is operating at, if you want Start of Frames (SOF’s) displayed, and what output format you want the traffic. You can also specify a specific USB Address or Endpoint you want to see. All other transactions will be filtered out. Leave the fields blank to see all transactions.
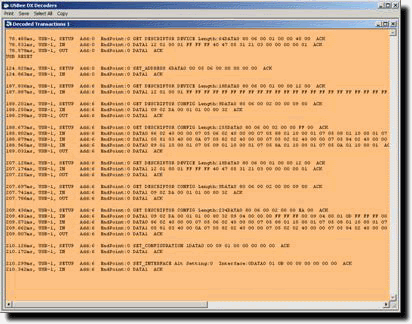
Then when you click and drag (with the right mouse button) on the waveform screen on that waveform, the bus traffic will be decoded as in the following screen.
I2C Bus Setup
The I2C Bus Decoder takes the captured data from a I2C bus, formats it and allows you to save the data to disk or export it to another application using Cut and Paste.
Hardware Setup
To use the Decoder you need to connect the USBee DX Test Pod to your hardware using the test leads. You can either connect the test leads directly to pin headers on your board, or use the test clips for attaching to your components.
The I2C Bus Decoder connects to the SDA and SCL lines of the I2C bus. Use one signal as the SDA data line and one signal as the SCL clock line. Also connect the GND line to the digital ground of your system. Connect these signals to the I2C bus using the test clips provided.
Software Setup
Activate the below Channel Settings Dialog by clicking the white box on the left of the signal names on the main application screen.
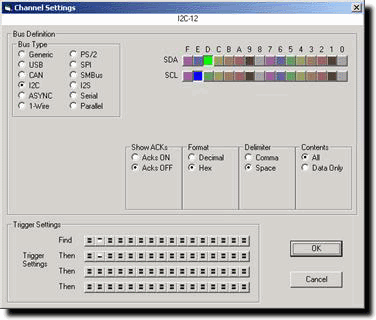
On the above dialog box, select the SDA and SCL signals, what portions of the transaction packet you want to see, and what output format you want the traffic.
Then when you click and drag (with the right mouse button) on the waveform screen on that waveform, the bus traffic will be decoded as in the following screen.
Async Bus Setup
The Async Bus Decoder takes the captured data from an asynchronous bus (UART), formats it and allows you to save the data to disk or export it to another application using Cut and Paste.
Hardware Setup
To use the Decoder you need to connect the USBee DX Test Pod to your hardware using the test leads. You can either connect the test leads directly to pin headers on your board, or use the test clips for attaching to your components.
The Async Bus Data Extractor uses one or more of the 16 digital signal lines (0 thru F) and the GND (ground) line. Connect any of the 16 signal lines to an Async data bus. Connect the GND line to the digital ground of your system.
Software Setup
Activate the below Channel Settings Dialog by clicking the white box on the left of the signal names on the main application screen.

On the above dialog box, select the channels you want to observe. Each channel can be attached to a different async channel. Also enter the baud rate (from 1 to 24000000), how many bytes per line you want output, the number of data and parity bits, and what output format you want the traffic.
Then when you click and drag (with the right mouse button) on the waveform screen on that waveform, the bus traffic will be decoded as in the following screen.
Parallel Bus Setup
The Parallel Bus Decoder takes the captured data from a parallel bus, formats it and allows you to save the data to disk or export it to another application using Cut and Paste. The Parallel Bus decoder is also a way to capture the data using an external clock.
Hardware Setup
To use the Decoder you need to connect the USBee DX Test Pod to your hardware using the test leads. You can either connect the test leads directly to pin headers on your board, or use the test clips for attaching to your components.
The Parallel Bus Data Extractor uses the 16 digital signal lines (0 thru F), the GND (ground) line. Connect the GND line to the digital ground of your system.
Software Setup
Activate the below Channel Settings Dialog by clicking the white box on the left of the signal names on the main application screen.
On the above dialog box, select the channels you want to include in the parallel data bus. You can also use any one of the 16 digital signals as an external clock. Choose if you want to use the external clock signal, the external clock edge polarity, how many bytes per line you want output, and what output format you want the traffic.
Then when you click and drag (with the right mouse button) on the waveform screen on that waveform, the bus traffic will be decoded as in the following screen.
1-Wire Bus Setup
The 1-Wire Bus Decoder takes the captured data from a 1-Wire bus, formats it and allows you to save the data to disk or export it to another application using Cut and Paste.
Hardware Setup
To use the Decoder you need to connect the USBee DX Test Pod to your hardware using the test leads. You can either connect the test leads directly to pin headers on your board, or use the test clips for attaching to your components.
The 1-Wire Bus Data Extractor uses any one of the 16 digital signal lines (0 thru F), the GND (ground) line. Connect the GND line to the digital ground of your system.
Software Setup
Activate the below Channel Settings Dialog by clicking the white box on the left of the signal names on the main application screen.
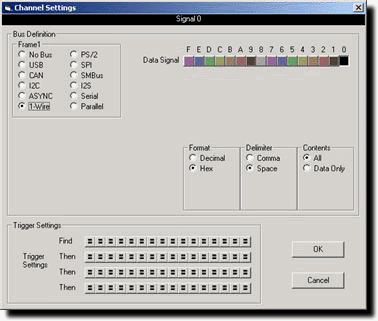
On the above dialog box, select the signal running your 1-Wire protocol. Choose if you want to see just the data or all information on the bus and what output format you want the traffic.
Then when you click and drag (with the right mouse button) on the waveform screen on that waveform, the bus traffic will be decoded as in the following screen.

SPI Bus Setup
The SPI Bus Decoder takes the captured data from an SPI bus, formats it and allows you to save the data to disk or export it to another application using Cut and Paste.
Hardware Setup
To use the Decoder you need to connect the USBee DX Test Pod to your hardware using the test leads. You can either connect the test leads directly to pin headers on your board, or use the test clips for attaching to your components.
The SPI Bus Decoder uses any one of the 16 digital signal lines (0 thru F) for the SS (slave select), SCK (clock), MISO (data in), MOSI (data out), and the GND (ground) line. Connect the SS, SCK, MISO, and MOSI to your digital bus using the test leads and clips. Connect the GND line to the digital ground of your system.
Software Setup
Activate the below Channel Settings Dialog by clicking the white box on the left of the signal names on the main application screen.
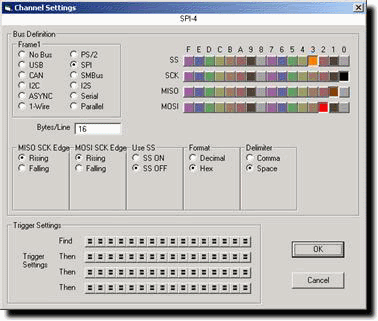
On the above dialog box, select the signals you plan to use for the SPI protocol. Also set the appropriate sampling edges for both data lines and if you would like to use the SS (slave select) signal. If you turn off the SS, all clocks are considered valid data bits starting at the first clock detected. Also choose what output format you want the traffic.
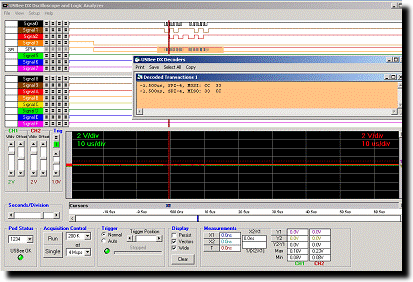
Then when you click and drag (with the right mouse button) on the waveform screen on that waveform, the bus traffic will be decoded as in the following screen.
SM Bus Bus Setup
The SM Bus Decoder takes the captured data from an SM bus, formats it and allows you to save the data to disk or export it to another application using Cut and Paste.
Hardware Setup
To use the Decoder you need to connect the USBee DX Test Pod to your hardware using the test leads. You can either connect the test leads directly to pin headers on your board, or use the test clips for attaching to your components.
The SM Bus Decoder uses any one of the 16 digital signal lines (0 thru F) for the SM Clock and SM Data, and the GND (ground) line. Connect the SM Clock and SM Data to your digital bus using the test leads and clips. Connect the GND line to the digital ground of your system.
Software Setup
Activate the below Channel Settings Dialog by clicking the white box on the left of the signal names on the main application screen.
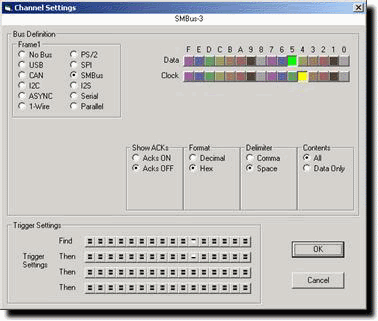
On the above dialog box, select the signals you plan to use for the SM Bus protocol. Also choose what output format you want the traffic.
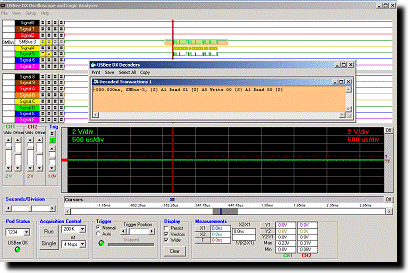
Then when you click and drag (with the right mouse button) on the waveform screen on that waveform, the bus traffic will be decoded as in the following screen.
Serial Bus Setup
The Serial Bus Decoder takes the captured data from a Serial bus, formats it and allows you to save the data to disk or export it to another application using Cut and Paste. The serial data can be from any clocked serial bus and can be aligned using a hardware signal or an embedded sync word.
Hardware Setup
To use the Decoder you need to connect the USBee DX Test Pod to your hardware using the test leads. You can either connect the test leads directly to pin headers on your board, or use the test clips for attaching to your components.
The Serial Bus Decoder uses any one of the 16 digital signal lines (0 thru F) for the Clock, Data and optional Word Align signal, and the GND (ground) line. Connect the Clock, Data and Word Align to your digital bus using the test leads and clips. Connect the GND line to the digital ground of your system.
Software Setup
Activate the below Channel Settings Dialog by clicking the white box on the left of the signal names on the main application screen.
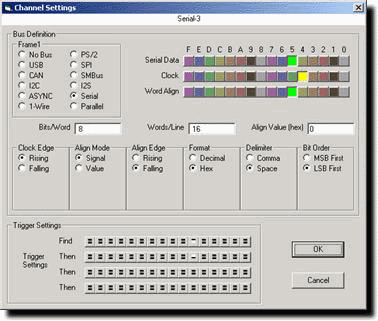
On the above dialog box, select the signals you plan to use for the Serial Bus protocol. Select whether you have an external word align signal (Align Mode = Signal) or if your serial data has an embedded sync word in the data stream (Align Mode = Value). The Bits/Word is the size of the Sync word as well as the output word size. Choose the bit ordering as well as the output format of the traffic.
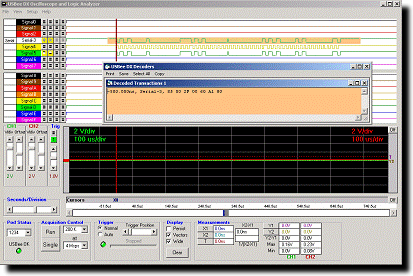
Then when you click and drag (with the right mouse button) on the waveform screen on that waveform, the bus traffic will be decoded as in the following screen.
I2S Bus Setup
The I2S Bus Decoder takes the captured data from an I2S bus, formats it and allows you to save the data to disk or export it to another application using Cut and Paste.
Hardware Setup
To use the Decoder you need to connect the USBee DX Test Pod to your hardware using the test leads. You can either connect the test leads directly to pin headers on your board, or use the test clips for attaching to your components.
The I2S Bus Decoder uses any one of the 16 digital signal lines (0 thru F) for the Clock, Data and Word Align signal, and the GND (ground) line. Connect the Clock, Data and Word Align to your digital bus using the test leads and clips. Connect the GND line to the digital ground of your system.
Software Setup
Activate the below Channel Settings Dialog by clicking the white box on the left of the signal names on the main application screen.
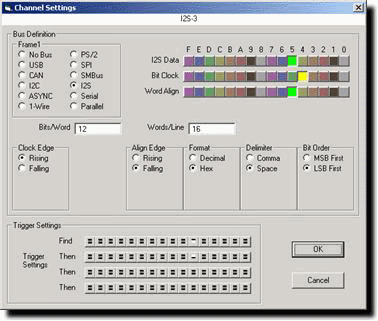
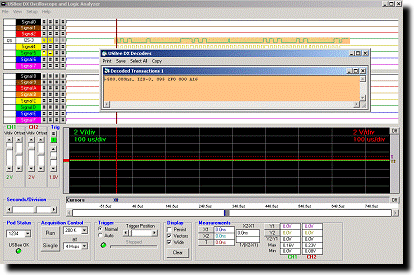
On the above dialog box, select the signals you plan to use for the I2S Bus protocol. Select the start edge for the external word align signal, the Bits/Word and the Clock sampling edge. Choose the bit ordering as well as the output format of the traffic.
Then when you click and drag (with the right mouse button) on the waveform screen on that waveform, the bus traffic will be decoded as in the following screen.
PS/2 Bus Setup
The PS/2 Bus Decoder takes the captured data from an PS/2 bus, formats it and allows you to save the data to disk or export it to another application using Cut and Paste.
Hardware Setup
To use the Decoder you need to connect the USBee DX Test Pod to your hardware using the test leads. You can either connect the test leads directly to pin headers on your board, or use the test clips for attaching to your components.
The PS/2 Bus Decoder uses any one of the 16 digital signal lines (0 thru F) for the Clock and Data signals, and the GND (ground) line. Connect the Clock and Data to your PS/2 bus using the test leads and clips. Connect the GND line to the digital ground of your system.
Software Setup
Activate the below Channel Settings Dialog by clicking the white box on the left of the signal names on the main application screen.
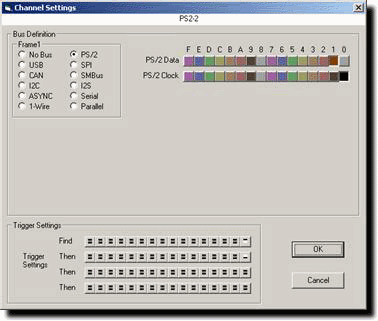
On the above dialog box, select the signals you plan to use for the PS/2 Bus protocol.
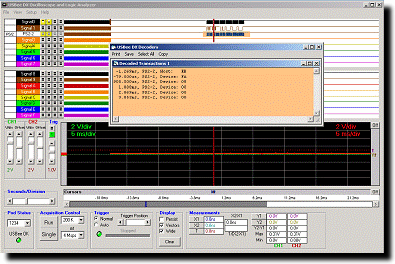
Then when you click and drag (with the right mouse button) on the waveform screen on that waveform, the bus traffic will be decoded as in the following screen.
|