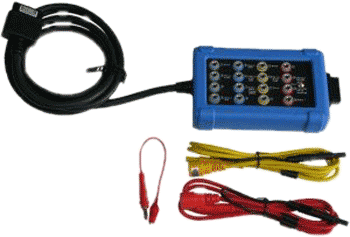
Connecting the TA012 Break Out Lead
Please read these instructions before using the two pin break out lead.
It may be possible to cause a short circuit to the oscilloscope unit if incorrect connections are made! A short circuit could seriously damage the unit and will require it to be repaired at the customers own cost.
It is recommended that the oscilloscope always has an earth (ground) connection to the unit on either of the channels (A or B). The remaining BNC connection can then be used to probe either side of the two pin break out lead, using a TA automotive test lead.
The following are a few examples of how to connect the two pin break out lead when testing various components.
Multipoint Fuel Injectors
Single Point Injectors
Inductive Crankshaft or Camshaft Sensors
Coolant Temperature Sensor
Knock Sensor
GM Ignition Coils
Austin / Rover Ignition Amplifiers
Bosch K-jetronic Fuel Injection System
Multipoint Fuel Injectors
The two connections on an injector are, (1) supply voltage (when cranking or running - not always when the ignition is switched on but the engine not running) and (2) an earth path controlled by the Electronic Control Module (ECM).
It is recommended that the oscilloscope is earthed on the black BNC connection and the remaining connection (the red) is used to probe either side of the two pin break out lead.
One connection to the two pin break out lead will show the supply voltage and the other side will show an injector waveform showing the injector duration. The oscilloscope will need to be set up correctly to display this waveform for both voltage, time base and trigger source along with the inclusion of the X20 voltage adapter, if available.
back to top
Single Point Injectors
Some single point injection units, predominantly Lucas / Rover, employ this style of electrical connector and can be connected in the same way as the multipoint version.
The settings for the oscilloscope will be the same as for the Multipont injection system.
Examples of injector waveforms can be found in the automotive waveforms library.
back to top
Inductive Crankshaft or Camshaft Sensors
These sensors can be referred to as the following:
CAS - Crank Angle Sensor
CPS - Crank Position Sensor
CID - Cylinder Identification Sensor
Some vehicles may employ two crankshaft sensors, both of the inductive type, one used for engine speed and the other used for crankshaft position. Both can be tested with the two pin break out lead, assuming the connections are compatible.
There are two ways in which these sensors can be tested.
As with the injector test, connect the oscilloscope black BNC connection to the vehicle's body, engine or battery negative as an earth connection. The red lead can then be used to probe either side of the two pin break out lead. An inductive sensor will produce its own voltage and will not be earthed to the engine. The two connections will be a sensor negative and positive voltage output. To display a waveform ensure the oscilloscope is set up on AC voltage and has a suitable voltage scale and time base. If the resultant waveform is lower than expected, connect onto the other fly lead.
As inductive sensors do not have a supply voltage and are not earthed to the engine this sensor can be tested using both the two pin break out leads connected directed to both the BNC leads (red and black.)
When testing if a lower than expected output is seen it may be that the polarity of the connections is incorrect, reverse the leads and re-test. The approach to connecting to the sensor may at first appear 'trial and error', this unfortunately cannot be avoided as there no commonality between manufacturers wiring.
Examples of Cam and Crankshaft sensor waveforms can be found in the automotive waveforms library.
back to top
Coolant Temperature Sensor
This particular sensor will have a voltage supply and a variable voltage output that is monitored by the vehicles ECM. It is recommended that the oscilloscope is earthed on the black BNC connection and the remaining connection (red) is used to probe either side of the two pin break out lead.
One connection of the two pin break out lead will show the supply voltage and the other side will show a voltage that generally decreases as the engine temperature increases. This will be the case for a sensor which has a negative temperature coefficient, the opposite will be seen if the sensor has a positive coefficient. Probe both the yellow and the blue connections to obtain the correct terminal to monitor the voltage change with rising temperature.
The oscilloscope will need to be set up correctly to display this waveform for both voltage, time base and trigger source.
Examples of Coolant temperature sensor waveforms can be found in the automotive waveforms library.
back to top
Knock Sensor
A knock sensor when fitted to an engine will be responsible for adjusting the ignition timing when 'knock' or 'pinking' occurs. The frequency of the detonation is always at the same point (15K Hz), under these conditions the crystal becomes excited and produces a voltage. As knock sensors do not have a supply voltage and are not earthed to the engine this sensor can be tested using both the two pin break out leads connected directed to both the BNC leads (red and black).
If when testing an inverted output is seen, the polarity of the connections are incorrect, reverse the leads and re-test.
Examples of a knock sensor waveform can be found in the automotive waveforms library.
back to top
GM Ignition Coils
Some of the early GM coils have an access point to the coils negative and positive terminals mounted towards the top of the component. This allows measurements to be made to both the positive and the negative terminals.
It is recommended that the oscilloscope is earthed on the black BNC connection and the remaining connection (the red) is used to probe either side of the two pin break out lead. One connection to the two pin break out lead will show the supply voltage and the other side will show the switching and the induced voltage. The oscilloscope will need to be set up correctly to display this waveform for both voltage, time base and trigger source along with the inclusion of the X20 voltage adapter.
Examples of primary ignition waveforms can be found in the automotive waveforms library.
back to top
Austin / Rover Ignition Amplifiers
This applies to the certain permanent magnetic pick-up varieties with the two connections being the coil negative and positive connections.
It is recommended that the oscilloscope is earthed on the black BNC connection and the remaining connection (the red) is used to probe either side of the two pin break out lead. One connection to the two pin break out lead will show the supply voltage and the other side will show the switching and the induced voltage. The oscilloscope will need to be set up correctly to display this waveform for both voltage, time base and trigger source along with the inclusion of the X20 voltage adapter.
Examples of primary ignition waveforms can be found in the automotive waveforms library.
back to top
Bosch K-jetronic Fuel Injection System
This basically mechanical fuel injection system has several connections that are compatible to the two pin break out lead.
The Warm-up Regulator: This component is responsible for the fuel enrichment during the warm-up phase and its two connections are a 12V supply from the fuel pump relay and an earth connection.
It is recommended that the oscilloscope is earthed on the black BNC connection and the remaining connection (the red) is used to probe either side of the two pin break out lead. One connection to the two pin break out lead will show the supply voltage and the other side will show the earth path.
The oscilloscope needs to be set correctly to display this measurement for both voltage, time base and trigger source.
The Auxiliary / Extra Air Valve: This is responsible for allowing extra air into the engine during the warm-up phase to increase the engines idle speed. Its two connections comprising of a 12V supply from the fuel pump relay and an earth connection.
It is recommended that the oscilloscope is earthed on the black BNC connection and the remaining connection (the red) is used to probe either side of the two pin break out lead. One connection to the two pin break out lead will show the supply voltage and the other side will show the earth path.
The oscilloscope needs to be set correctly to display this measurement for both voltage, time base and trigger source.
The Thermo Time Switch:: This is responsible for the operation of the cold start injector. The two connections on the break out lead will have a constant 12v while the starter motor is cranking and an earth path for up to approximately 10 seconds (depending on coolant temperature). It is recommended that the oscilloscope is earthed on the black BNC connection and the remaining connection (the red) is used to probe either side of the two pin break out lead.
The oscilloscope needs to be set correctly to display this measurement for both voltage, time base and trigger source.
The Cold Start Injector: This injector works in conjunction with the thermo time switch, and delivers a small amount of fuel into the inlet manifold.
It is recommended that the oscilloscope is earthed on the black BNC connection and the remaining connection (the red) is used to probe either side of the two pin break out lead. The oscilloscope needs to be set correctly to display this measurement for both voltage, time base and trigger source.
back to top
|